 Skip to content


How To Weld - A Comprehensive Guide To Welding
Welding is a metal joining process that serves as a cornerstone in various industries, from construction to manufacturing. It offers the power to fuse metals with precision, which makes it highly versatile. While it was considered a highly specialized field in the past, welding today has become highly popular among beginners, hobbyists, and DIY lovers.
In our comprehensive guide to welding, we unravel the fundamentals, techniques, and equipment essential for mastering this indispensable skill. From understanding different welding processes like MIG, TIG, and Arc welding to safety protocols and material considerations, this guide equips both beginners and seasoned welders with valuable insights on how to weld.
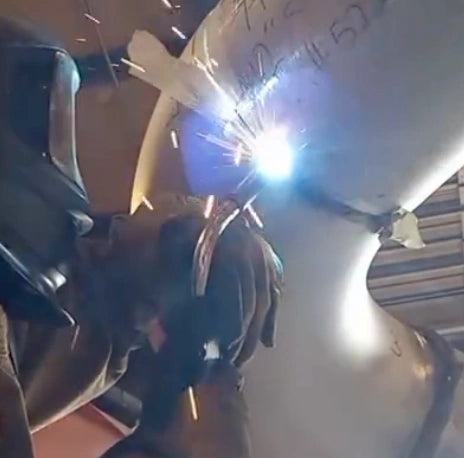
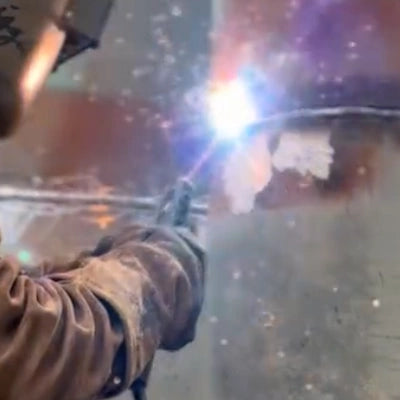
MIG Welding Process
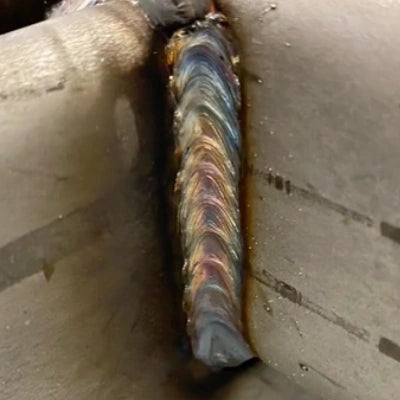
Photo by @chocorroll_welder (TikTok)
What Is Welding?
Welding is a metal joining process in which two pieces are joined through fusion. This fusion occurs when heat is applied to the materials, causing them to melt and combine. The heat is produced by a welding arc or other heat sources, such as a laser, friction, or resistance. As the molten materials cool and solidify, they create a strong and permanent bond between them, known as a weld.
As a result, welding is essential for creating structures, machinery, vehicles, and various other products where a durable and reliable connection between metal components is required. Welding is widely used in construction, manufacturing, automotive, aerospace, and shipbuilding industries, among others.
Compared to other metal joining processes, such as adhesives, riveting, or bolting, welding is considered somewhat more challenging to master. It can also fail to weld dissimilar metals. However, welding produces durable and everlasting bonds that hold well against atmospheric conditions, which makes it highly useful in many industrial applications.
If you are an absolute beginner looking to learn more about welding, we suggest you first check out the 100 welding terms you need to know.
Types Of Welding Processes
Welding can be performed using one of the many methods, and each is suited for specific applications and materials. However, all types of welding processes can be divided based on the heat source. Based on the source of the heat used to melt and fuse pieces, the most common types of welding processes include:
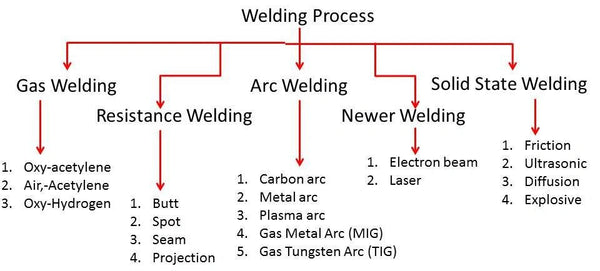
Source: https://www.rocheindustry.com/types-of-welding/
- Arc welding methods use the heat of a welding arc. The arc is formed between an electrode and base metal. MIG welding, Stick welding, TIG welding, and Flux core welding are the most common.
- Resistance welding methods generate heat through the electrical resistance of the metals, the contact resistance between them, and the electrical current. Standard resistance welding methods are Spot welding, Projection welding or Seam welding.
- Gas welding methods use heat created by burning gases, typically a mixture of oxygen and acetylene. When mixed, they reach high temperatures suitable for welding or cutting.
- Solid-state welding methods that join the surface are achieved without melting by applying pressure with or without heat. Standard methods are friction welding, FSW, roll bonding, diffusion welding, and ultrasonic welding.
- Laser welding methods use the heat of a laser to melt and fuse pieces.
- Electron-beam welding is a fusion process in which a beam of high-velocity electrons is applied to join two materials.

Since this is a comprehensive guide to welding for beginners, we will focus more on the arc welding processes, which you will likely deal with as a new welder. MIG, TIG, Stick, and Flux core welding are your go-to processes, so let's talk more about them.
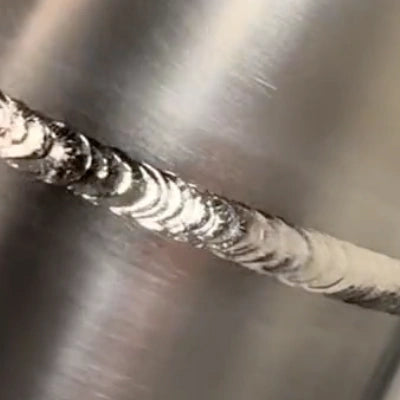
MIG Welding (Gas Metal Arc Welding)
MIG (Metal Inert Gas) welding or Gas Metal Arc Welding (GMAW) is a semi-automated welding process that uses the heat of the welding arc to join the pieces. A MIG welding arc is initiated between the consumable electrode wire and the workpiece.
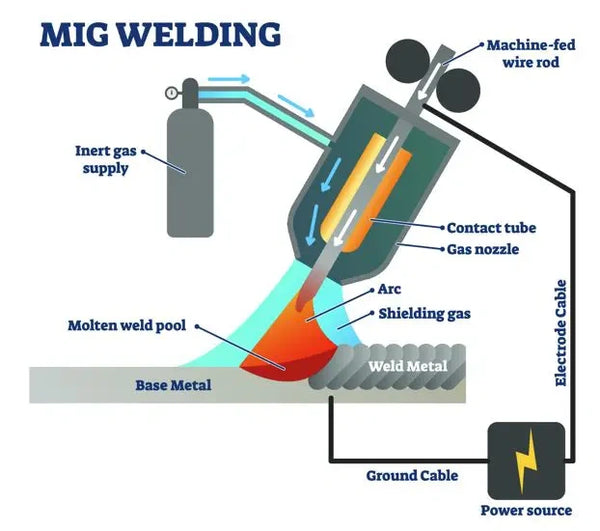
Source: https://fractory.com/mig-welding-explained/
The MIG arc reaches 6,000 to 10,000 °F and melts both the electrode wire and the base metal, creating a pool of molten metal. As the weld progresses, the electrode wire is automatically fed into the weld pool, adding a filler material to strengthen the joint. A welding gun also supplies a shielding gas (typically a mixture of argon and carbon dioxide) to protect the weld area from atmospheric contamination.
MIG welding is considered one of the most straightforward welding processes, making it highly suitable for hobbyists, beginners, and new welders. However, MIG welding is also known for its versatility, high welding speeds, and ability to weld a wide range of metals and thicknesses. You can use it to MIG weld stainless steel, steel, or aluminum. Similar to TIG, there are now pulsed MIG and double-pulsed options for best MIG welding aluminum results.
Learn more about How To MIG weld and How to set up your MIG welder for first use.
TIG Welding (Gas Tungsten Arc Welding)
TIG welding (Tungsten Inert Gas welding), or Gas Tungsten Arc Welding (GTAW), is a precise and manual arc welding process commonly used for welding thin sections of stainless steel, aluminum, and other non-ferrous metals. It provides excellent heat control through precise parameters and features such as pulsed welding, which makes it a highly specialized process.
A welding arc is created between a non-consumable tungsten electrode and base metal in TIG welding. Tungsten has the highest melting point, so it can withstand the heat of the arc without being consumed, ergo the name non-consumable electrode.
The heat again melts both pieces and a filler metal (if required). When welding thin and delicate metals with little to no gap, you don't need a filler rod, known as an autogenous welding process. However, TIG welding thicker pieces will require a bevel or groove and a filler metal. The name manual welding method means you will have to feed the TIG rod into the joint manually.
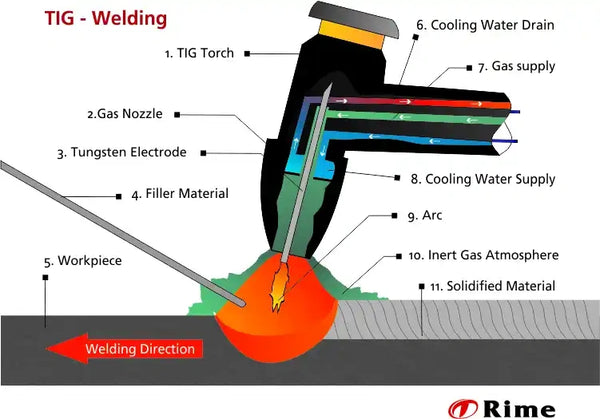
Source: https://rime.de/en/welding/tig-welding/
Like MIG, TIG welding requires a shielding gas to protect the tungsten electrode and weld puddle from contamination. TIG welding is a clean process that requires pure inert shielding gas such as argon, and surfaces must be squeaky clean. However, since GTAW is a manual method, it is considered the hardest to master.
Check out our dedicated article on How To TIG Weld.
Stick Welding (Shielded Metal Arc Welding)
Stick welding, MMA welding, or Shielded Metal Arc Welding (SMAW) is another manual welding process that is the industry's favorite due to its simplicity, portability, and ability to weld a variety of metals. The welding arc is formed between the consumable electrode and base metal.
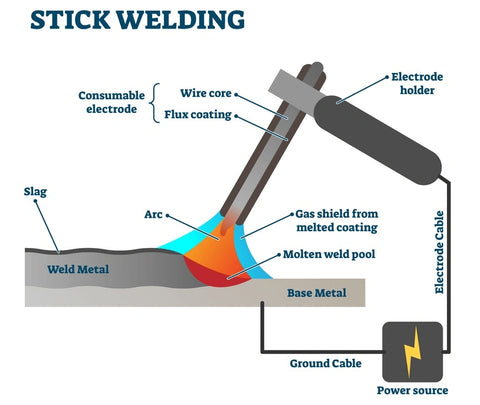
Compared to MIG and TIG welding, the consumable stick electrode is covered with a flux layer. As the heat of the arc melts the pieces and electrode, the layer of flux melts and sits on top of the weld pool to protect it from atmospheric contamination. After the welding, you simply remove the slag, and your weld is ready. However, remember that some stick electrodes can be difficult to run.
Stick welding is favored due to its ability to work outside without a risk of contamination. The wind and draft can blow out the shielding gas, so the flux is highly useful in on-field repairs and work. In addition, it is a cheap and fast welding process, which makes it highly versatile and valuable. However, it can be somewhat more complicated to master than MIG, but certainly more accessible than TIG.
Check out this article to learn more about How To Stick weld.
Flux Core Welding (Flux-cored Arc Welding)
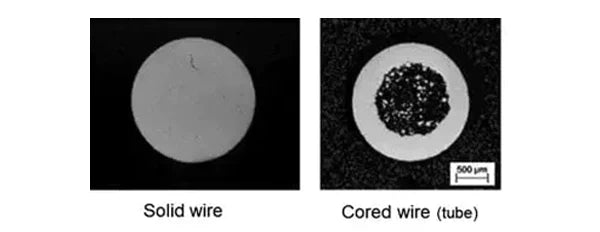
Flux-cored welding, or Flux-cored Arc Welding (FCAW), is a semi-automated wire-welding process, a variant of MIG welding. Like MIG welding, FCAW also includes automatically fed electrode wire, but the primary difference is in the wire composition.
Like Stick welding, Flux-cored arc welding uses a self-shielded or flux-cored wire electrode. This hollow wire filled with flux also creates a layer of slag as it melts to protect the molten weld puddle from contamination. Check out our comprehensive article to learn more about the differences between a Flux cored and a Solid wire.
Source: https://www.materialwelding.com/metal-cored-welding-vs-flux-cored/
As a result, Flux-cored arc welding combines versatility and ease of use, making it widely used. However, a wire can be more expensive than electrodes, and the weld quality is lower than that of TIG welding. Remember that FCAW can also be improved by using a shielding gas in a dual-shielded Flux core welding process.
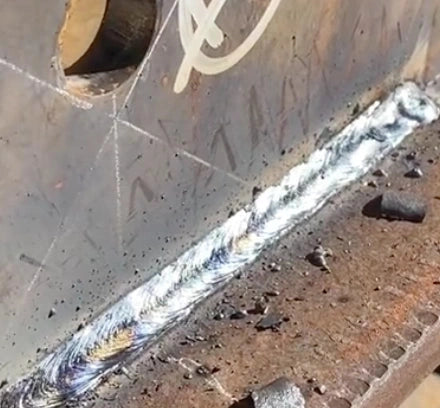
Photo by @kentaoanoba (TikTok)
Read more to understand How to get the strongest flux core weld.
How To Weld - Step By Step Guide
Now that you have a brief understanding of welding and your options, it is time to learn how to weld in a step-by-step guide. Some consider welding a reasonably complex metal joining process, but if you get every step of the process right, you are set for success. So, let's dive into it.
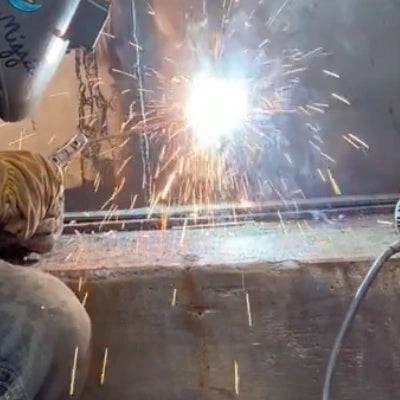
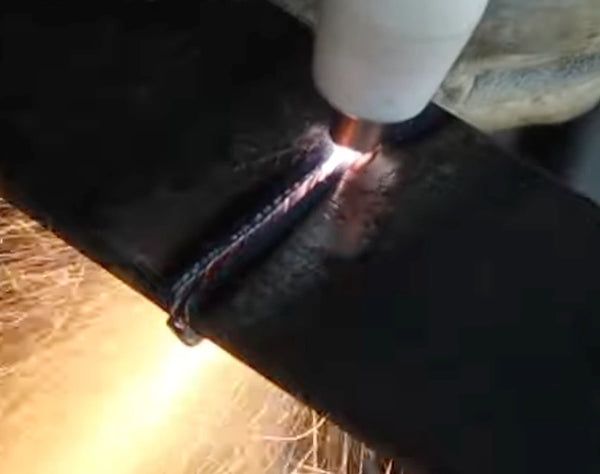
Stick Welding Process
Photo by @datboimiggz (TikTok)
Step 1: Choose the suitable process
Each type of welding has its ups and downs, and choosing the correct process is crucial in achieving the strongest and best results. The first step in any welding project should be selecting the most suitable welding process for the given metal. To do so, you will have to ask yourself the following questions:
- What type and how thick is the metal?
- How skilled are you, and how complex is the project?
- Are you welding inside or outside?
- What's the desired quality of the finished weld?
You can always choose MIG, Flux-core, or Stick welding if you primarily use medium-thickness mild steel or carbon steel. As the thickness increases, you should favor Stick or FCAW. You should switch to TIG welding for the best results if welding thin and delicate non-ferrous metals such as aluminum, copper, titanium, magnesium, and nickel alloys.
Regarding the skill, if you are new to welding, favor MIG or Flux-cored welding, as they are fairly easy to use and control. However, complex projects will often require techniques such as TIG or Stick.
If you are welding indoors, you can use any method, but remember that melted flux in electrodes and flux core wire releases toxic fumes that can be dangerous in confined spaces. Meanwhile, you should use flux processes when welding outdoors since the wind can blow away the shielding, opening the room for contaminants and welding defects.
Finally, go for TIG welding for the highest-quality and critical welds. Even though it is more complex and slow, TIG can yield the best results. MIG welding is somewhere in between, and it can produce some pretty welds, while Stick and FCAW can make some spatter and uglier welds.
Step 2: Grab The Right Equipment and Accessories
Now that you have decided what process to use, it is time to grab the required equipment. The required equipment includes a welding machine, shielding gas, consumables, and accessories to help you during the welding.
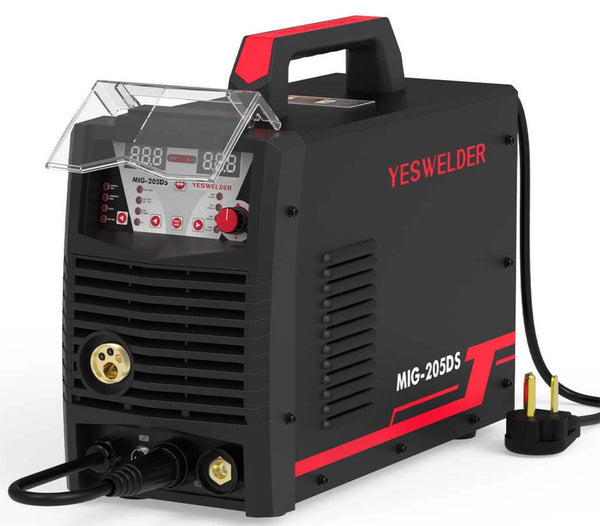
- A welding machine is central to welding, and choosing your first welder can be tricky. Your choice will depend on the process you consider the best for your applications, but if you are unsure, you can't go wrong with a multi-process welder such as YesWeler MIG-205DS-B.
- Welding accessories: include welding torches, ground cables, gas-flow regulators, etc. Most renowned manufacturers today, including the YesWelder, will provide you with everything in the package, so you shouldn't worry too much about them. However, you want your leads long enough and a torch or MIG gun comfortable.
- Welding consumables are the pieces consumed during the process, including the stick electrodes, MIG welding wires, tungsten electrodes, torch parts such as nozzle, gas lens kits, shielding gas, and more. These pieces of the equation are something you cannot do without, so make sure you choose the filler according to the metal you are about to weld and TIG welding tungsten appropriately to the metal you are about to weld.
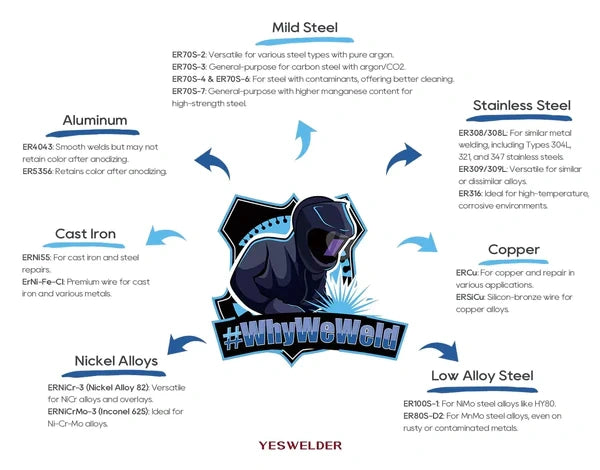
Types of MIG Welding Wires
- Shielding gas: If you decide on MIG or TIG welding, you must provide external shielding gas to protect the weld from contamination. MIG welding shielding gas is typically a mix of argon and CO2 or even pure CO2 (MIG vs. MAG welding). Meanwhile, TIG welding shielding gas generally is pure argon or a mixture of inert gases—argon and helium.
- Safety gear: Welding is a hazardous profession, so welding safety always comes first. That's why you'll need a welding helmet, a long-sleeved jacket, and welding gloves. These will protect your eyes, skin, and hands from intense radiation, heat, burns, electrical shock, and injuries.

Source: https://www.allaboutpiping.com/welding-hazards-and-control-measures/
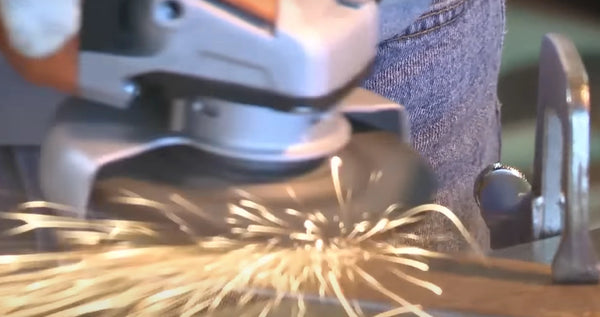
- Welding tools: Tools such as a grinder, chipping hammer, file, sanding paper, magnets, metal-cutting chop saw, or hacksaw are not essential as welding accessories and equipment, but they will make your welding much easier. These tools will help you prepare the pieces, and you can also use plasma cutting as a very convenient option for shaping and cutting metal.
Step 3: Prepare The Pieces For Welding
Careful weld preparation and cleaning are as necessary as learning how to weld or perform the weld. As a rule of thumb, the more time you spend preparing and cleaning the pieces before welding, the better results you'll get, and the less time you will spend cleaning the final pieces.
Before welding, you need to remove impurities and coatings from the surface.
Source: https://www.youtube.com/watch?app=desktop&v=FF_9qGJnXRU
Start by thoroughly cleaning the surfaces of the metal you are about to weld. If you try to weld through dirt, rust, paint, or mill scale, you'll get lots of spatter, boiling substances, and fumes, so it is essential to remove them before welding. You can use an old rag and a simple degreaser for light contamination.
However, if there is a thicker layer of rust, you'll need to pull out the "bigger guns." You will need a grinder or an acid solution that can penetrate deep enough to remove all the contamination.
This is just a brief explanation, so check out our comprehensive article on How to clean metal before welding to learn more.
Step 4: Edge Preparation and Part Fit-Up
Once your pieces are clean, you should fit them up, tack or clamp, and bevel them if necessary. The edge preparation and fit-up will mostly depend on the thickness of the metal.
You don't have to leave the gap when welding sheet metal or steel up to 1/16" thick. These thin pieces are best welded by autogenous welding or welding without a filler metal. The two pieces are melted and fused by the heat of the welding arc.
Welding steel over 1/16" up to 3/8" will require a gap between pieces. To fill it, you will need to use an excessive metal in the form of a filler wire, electrode, or rod. As a beginner or hobby welder, you will likely deal with these thicknesses, and there is no special preparation.
When welding thick metals from 3/8" up to 1/4 or 1/2", reaching full penetration will require lots of power and thicker electrodes, and it is still not guaranteed that you'll get a proper penetration. That's why welders bevel the edges and leave a root gap. Parts up to 3/8" will require a 45-degree bevel and multiple passes to fill the entire gap. The AWS (American Welding Society) recommends 60-70-degree weld prep for pieces thicker than 3/8".
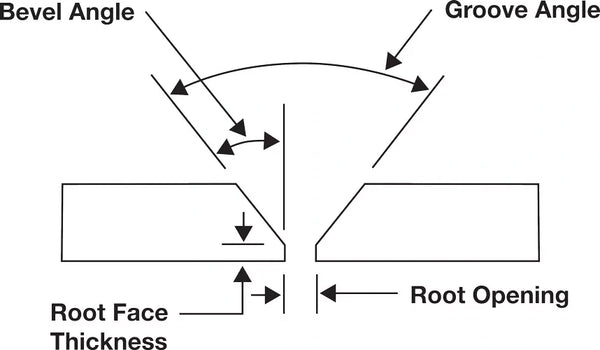
Source: https://www.thefabricator.com/thefabricator/article/powertools/the-next-generation-of-portable-beveling
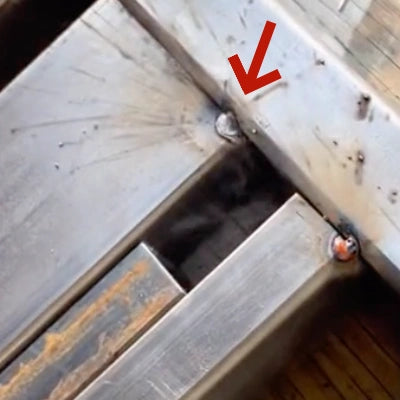
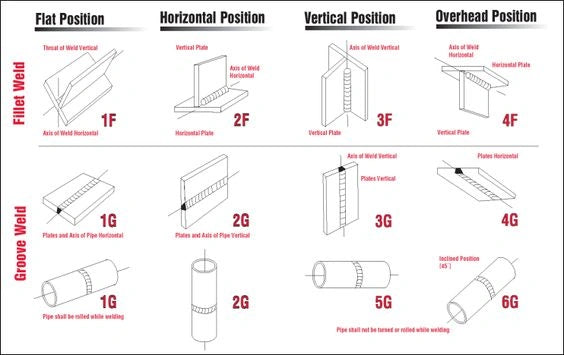
Once your edges are clean and prepared, you should align, clamp, and/or tack the pieces to hold them in place. Clamping down the work will ensure it stays in place as you move the torch, and you can also leave a couple of tack welds. As a beginner, you should always prepare pieces in a flat position, but if you want to learn more, feel free to check our article on Welding positions explained.
Step 5: Set Up Your Welder And Use Correct Parameters
Today's welders are almost plug-and-weld machines and are relatively easy to use and set up. You get everything you need inside the box and follow the manual or our article on how to set up your TIG welder for first use. But look at the welder's power options when connecting to a power source. Welders can run on 110V, 220V, or both AC, DC current, or both, and DCEP or DCEN welding polarity.
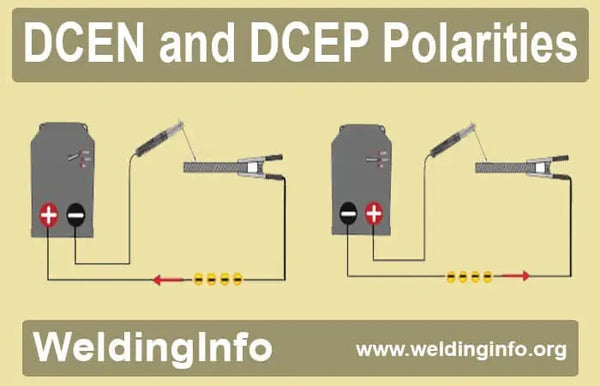
Source: https://www.weldinginfo.org/welding-technology/dcen-and-dcep-polarities/
However, the more challenging part is adjusting the controls and parameters. You must set the amperage, voltage, and gas flow rate to get the proper weld penetration and clean, high-quality welds. Voltage and amperage will directly depend on the thickness of the metal, while gas flow depends on the conditions in which you are welding.
Welding amperage measures the strength of the electrical current, affecting the melt-off rate of the electrode and the depth of penetration into the base material. As a rule of thumb, each .001 inch of material thickness requires 1 amp of output: .125 inch = 125 amps. You directly set up the amperage with Stick and TIG welding or Wire Feed Speed (WFS) in MIG and Flux-core welding.
Set up the amperage with MIG welding for YesWelder MP200.
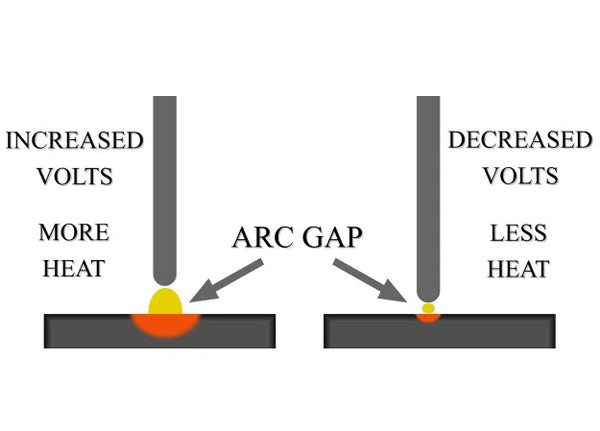
Welding voltage is the carrying force of the electrical current. Voltage controls the arc length: the distance between the weld pool and the wire filler metal at the melting point within the arc. The weld bead will flatten out as the voltage increases, and its width-to-depth ratio will increase. In manual welding processes (Stick and TIG welding), you manually control the voltage by moving the electrode tip closer or farther to the weld joint. At the same time, you can adjust the amperage directly on the machine.
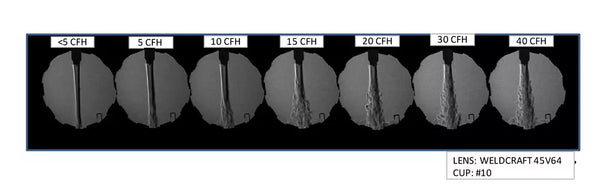
Shielding gas flow is the amount of gas that flows out of your torch, measured in cubic feet per hour (CFH). The recommended gas flow rating is 15-30 CFH, but it can depend on the welding conditions. You can weld indoors with no draft with 15-20 CFH, but if you notice porosity, you should increase it to 20-25 CFH or up to 30 CFH if there is a draft. Using high rates will create turbulent forces that suck in the atmospheric gases, causing porosity and other defects.
Getting the perfect balance between wire feed speed (amperage), voltage, and electrode diameter will depend on the thickness and type of base metal, as well as the electrode or welding wire and welder manufacturer. That's why there is no one-size-fits-all approach.
So instead of using charts that don't have to apply in all conditions, you can check our dedicated articles on How to MIG weld, How to TIG weld, and How to Stick weld different thickness metal.
Step 6: Lay Your First Bead
Laying your first bead can be a great but also a negative experience, based on the results you get. But don't worry, nobody makes perfect welds at first. It's something you'll work on and perfect over time.
The best practice is to find scrap metal with the same thickness and type of base metal you planned on working on for your project. Observe how the weld puddle changes under different conditions and parameters to adjust it properly. Positioning the body is crucial, as is keeping clear of the smoke produced by the weld and having a good view of the weld puddle.
However, the key lies in the proper technique, and there is a simple anagram known as a CLAMS to help you remember the elements of the method: Current settings, Length of the arc, Angle of travel, Manipulation of torch or MIG gun, and Speed of travel.
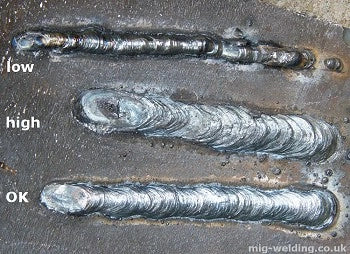
Current settings will highly impact your weld results, as too little heat will create improper penetration, and your electrode will stick to the base metal. Too high a current can create burn-through, excessive electrode melting, high arc sound, and spatter. If you notice any of these symptoms, tune your amperage 5-10 amps until you get a sweet spot of proper penetration without other issues.
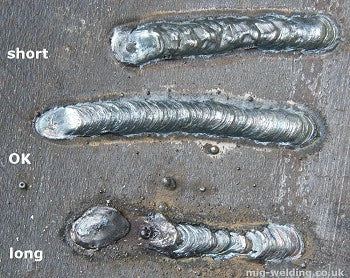
The Length of the arc is the distance between the electrode tip and the base metal, and this length should not exceed the diameter of the core of the electrode. A long arc will create an inconsistent arc start, with a convex bead profile and poor tie-in at the toes of the weld. Too short arc creates inconsistent penetration and a turbulent weld pool that fails to penetrate the base material consistently.
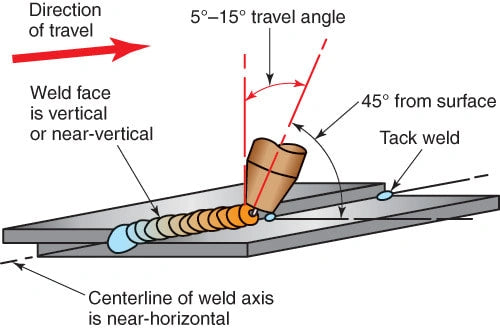
The Angle of travel is the angle between the electrode axis and a line perpendicular to the weld axis. A travel angle of about 5 to 15 degrees will yield the best results.
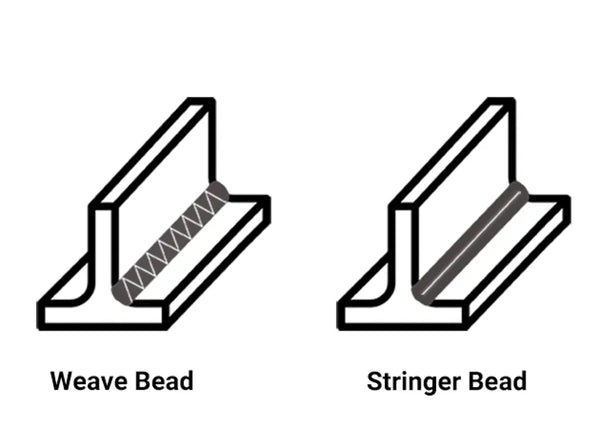
Manipulation of the torch comes with years of practice, but there are two basic methods: stringer beads and weaving. Stringer bead includes moving the torch in a straight line without any side-to-side motion. Weaving includes moving the torch in one of the many patterns, such as zig-zag, crescent, circles, or trapezoids. Stringers are your friend as a beginner and have simple welds, but you should switch to weaving once you need to fill larger gaps or during out-of-position welding.
Source: https://smooth-robotics.com/weaving-in-welding/
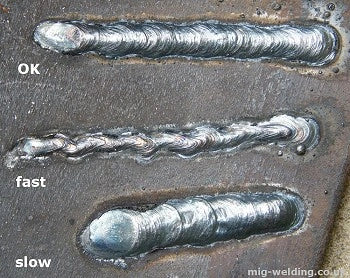
Speed of travel is a crucial factor in getting the correct weld. Your travel speed should allow you to keep the arc in the leading one-third of the weld pool. Going too slow will focus more heat into the joint while moving too fast can result in improper penetration.
The welding technique comes with hours of practice and welding. The key is to find a sweet spot with proper penetration, good tie-in, and weld profile and little to no spatter left to clean up. Keep in mind that some metals are harder to weld than others. You can have issues welding aluminum, cast iron, titanium, or magnesium.
Step 7: Post Weld Inspection And Cleaning
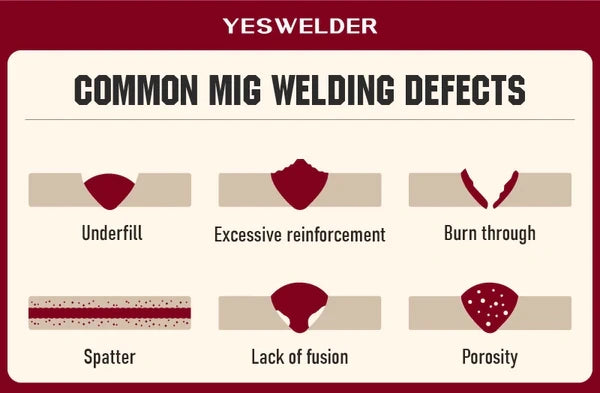
After you finish your first weld bead, you should look closer. Many welding defects can be seen at first glance, so visual inspection is a step you should consider. Uneven beads, globes, holes, cracks, and spatter are never signs of a strong weld. Besides the appearance, weld defects can compromise the structural integrity of the weld, so depending on the number of them, you should rework the pieces.
As noted, the amount of post-weld cleaning will depend on the time you spend preparing the weld, but even if you get everything "squeaky clean," you might have to do some brushing and cleaning. If you use flux methods such as FCAW or SMAW, remove the slag layer before making any following passes or adjustments. You can always brush or grind the sharp edges to ensure your pieces are safe to use.
Conclusion
Learning how to weld is, like any other profession, a journey that takes a lot of time and practice. While it is practically impossible to explain everything in one article, we provide all the knowledge you need to master the art of welding in our comprehensive guide to welding.
Treat this piece of information as your good friend in the world of welding. Follow the links we provided to learn everything you wanted to know about welding and its challenges.
🧐How To Weld - A Comprehensive Guide To Welding FAQ
1. What are advantages of MIG welding?
MIG welding is considered one of the most straightforward welding processes, making it highly suitable for hobbyists, beginners, and new welders. MIG welding is also known for its versatility, high welding speeds, and ability to weld a wide range of metals and thicknesses. You can use it to MIG weld stainless steel, steel, or aluminum. Similar to TIG, there are now pulsed MIG and double-pulsed options for best MIG welding aluminum results.
2. How to weld?
Here's a concise step-by-step guide on how to weld:
Step 1: Choose the suitable process
Step 2: Grab The Right Equipment and Accessories
Step 3: Prepare The Pieces For Welding
Step 4: Edge Preparation and Part Fit-Up
Step 5: Set Up Your Welder And Use Correct Parameters
Step 6: Lay Your First Bead
Step 7: Post Weld Inspection And Cleaning
👏 You may be interested in the following:


Leave a comment