 Skip to content


How To MIG Weld Stainless Steel Like a Pro
MIG welding stainless steel may seem like a daunting task at first. However, if you know how to set your MIG equipment and understand a few fundamentals about stainless steel, you'll become better at it in no time.
This article will teach you about different stainless steels, how to set up the MIG welding equipment, a proper pre-cleaning process, and essential techniques for MIG welding stainless steel.
The most challenging part of welding any material is learning through the mistakes. There are often tens of variables where you could make an incorrect approach and make poor welds. So, let's get you up to speed on MIG welding stainless steel and help you accelerate your progress.

Source: https://fractory.com/mig-welding-explained/
Why It's Hard To Weld Stainless Steel
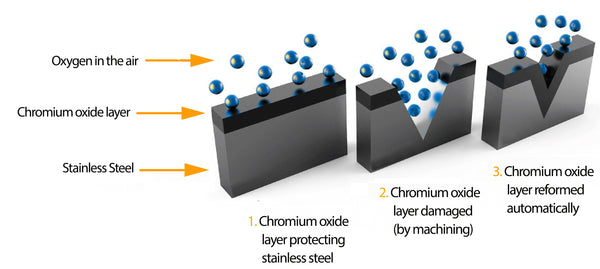
Stainless steels are an alloy of iron and chromium, but they can also contain nickel and other elements depending on the stainless steel type and alloy. The chromium forms a chromium oxide on the surface of stainless steel, responsible for its corrosion resistance.
Source: https://www.nitty-gritty.it/en/stainless-steel-passivation-process/
But stainless steel has many other characteristics different from mild steel, and they are not all positive. So, while stainless steel is resistant to corrosion and has beautiful aesthetic features, its material structure makes it more challenging to weld.
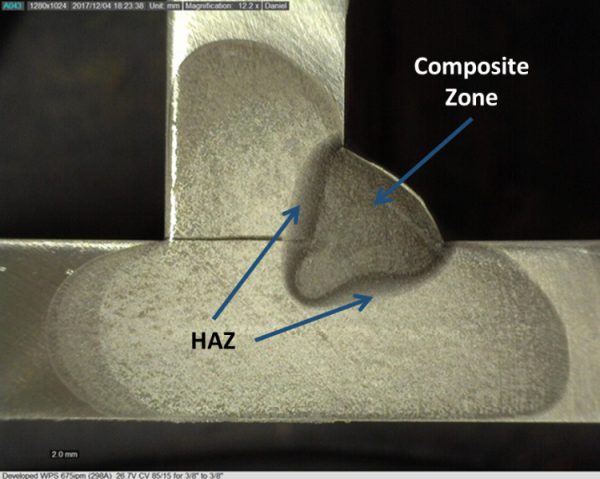
Unlike mild steel, stainless steel retains much more heat and has about 50% greater thermal expansion than typical carbon steel. But, its low heat conductivity should be your primary concern when welding this material. The welded joint and the heat-affected zone ("HAZ") don't dissipate heat into the base metal as quickly as the mild steel – the heat is much more concentrated in the joint. You can easily see this difference as you terminate the weld; the weld bead will remain bright red for a longer period than when you terminate the bead on mild steel.
Source: https://weldinganswers.com/the-importance-of-the-heat-affected-zone-haz/
The heat retention itself wouldn't be much of an issue if it weren't for something called the carbide precipitation process. When stainless steel is overly heated and kept at high temperatures (between 800 and 1400°F), the chromium and carbon form chromium carbides. These two elements are usually evenly spaced in stainless steel. However, when chromium carbide forms, the chrome must migrate to combine with carbon. So, as chromium is depleted in certain zones, the stainless steel loses corrosion resistance in those spots.
If the stainless steel loses corrosion resistance, you have wasted the material. If you didn't need corrosion resistance, you could have just used a less expensive mild steel. Plus, the intergranular corrosion in stainless steel also weakens the material. Therefore, if you overheat the stainless as you weld it, you'll likely have a weak weld, which could be dangerous depending on the application.

Intergranular corrosion grain boundary attack and dropped grains. Photo credit: TMR Consulting
How To Recognize if You've Overcooked The Stainless Steel Weld
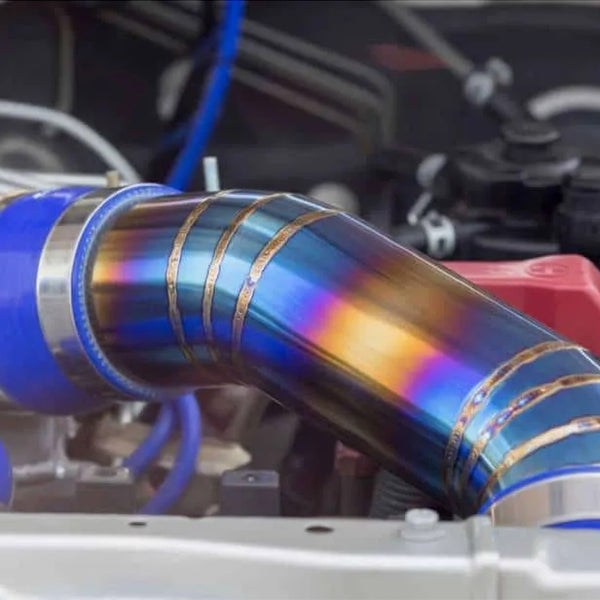
If you overheat the stainless steel, the HAZ and the weld will turn dark purple or black. If the weld is entirely black, it has gone through the carbide precipitation and you should rework it.
However, straw-colored, bright yellow, and light blue welds should be safe if everything else is done correctly—the lighter the weld, the lower the chances of carbide precipitation and intergranular corrosion.
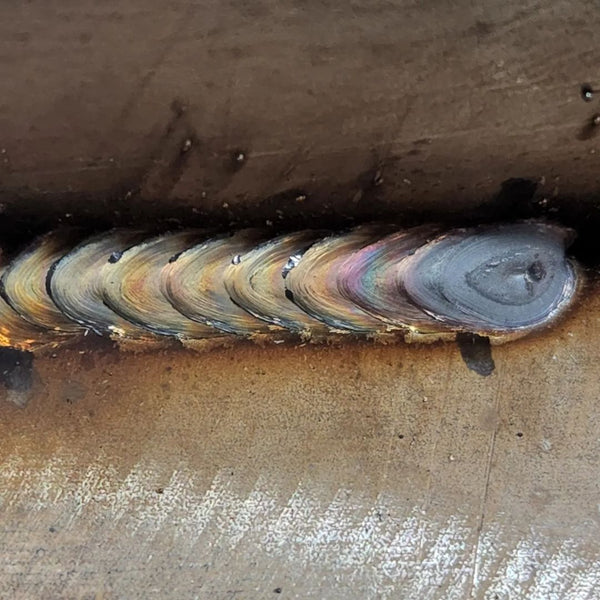
Photo by @the_humble_welder
Now, while we discussed the challenges of welding stainless, please remember that you CAN do this. Stainless is not a boogie man, and tens of thousands of welders weld it perfectly, and you can too, with practice.
Stainless Steel Types
Before we proceed with the MIG equipment setup and welding tips, let's quickly explain the different stainless steel types.
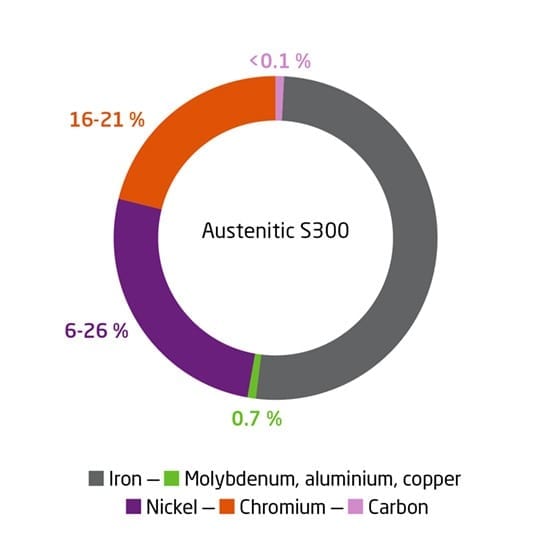
An important note here: our entire article discusses the most commonly available and welded stainless steel, the 300-series, austenitic type. Unless you are doing some specialized work, you are most likely to be working with the 300-series stainless steels.
Source: https://www.aperam.com/stainless/our-offer-by-family-grades/austenitic/
Types of stainless steel:
- Austenitic - 300-series, primarily 304 and 316. This material has fantastic weldability, which is partly why it is so widely used in most industries.
- Ferritic - 400-series, primarily 430 and 434. Unlike austenitic stainless steel, ferritic stainless steel is magnetic and has a lower nickel content, making it more difficult to weld.
- Martensitic - Also 420-series, primarily 420. High tensile strength, but its application is infrequent.
- Duplex - Stainless steel type produced by mixing austenitic and ferritic stainless steel. They are often used for pipeline production because they have exceptional strength and higher corrosion resistance.
Source: https://masteel.co.uk/news/what-is-duplex-and-super-duplex-stainless-steel/
MIG Welding Stainless Steel - Equipment Setup
Alright, let's get to the good stuff. Setting up your welding equipment is crucial to successfully MIG welding the stainless steel. There are several variables here that, if set incorrectly, can have severe consequences on the weld quality. So, let's talk about how to set it all up properly.
Shielding Gas
The best shielding gas for standard, manual short-circuit MIG welding of stainless steel is the so-called "Tri-Mix" gas. The mix of 90% helium, 7.5% argon, and 2.5% carbon dioxide offers a desirable bead contour and keeps the CO2 levels low to prevent carbon from causing corrosion resistance loss. Using more CO2 in the mixture can harm the material's corrosion resistance. As a result, you can't use a standard 75% argon / 25% CO2 shielding gas used for mild steel. Of course, pure carbon dioxide would result in poor welds.
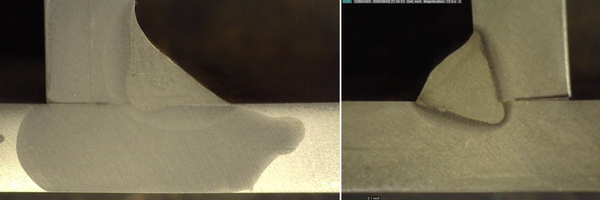
The weld on the left used 98Ar/2CO2 as a shielding gas. The one on the right used 85Ar/15CO2. Both were ran at the same amperage.
Source: https://weldinganswers.com/danger-of-using-the-wrong-shielding-gas-for-gmaw/
You can also use an argon-oxygen mixture (1-2% oxygen) for slightly improved arc stability but at the expense of some oxidation in the weld pool.
The tri-mix gas is your best bet because helium widens the root penetration and the argon and carbon dioxide (in small amounts) help the arc stay stable. This is the most commonly used shielding gas for MIG welding stainless steel.
Polarity
Like almost all MIG welding applications, MIG welding stainless steel requires a direct current electrode positive or DCEP polarity. This means that you should attach the ground clamp to the negative terminal and the MIG gun to the positive terminal. Simply use the MIG welder as if you were welding mild steel; there is no change in polarity.
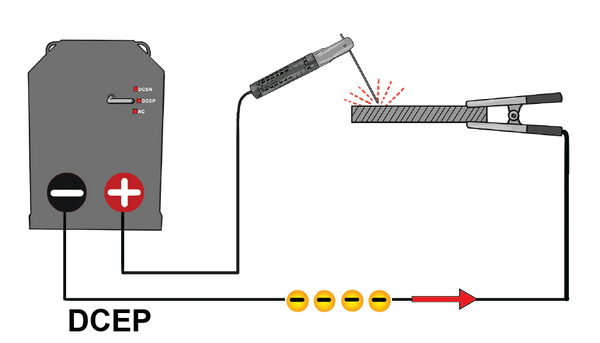
Source: https://awo.aws.org/glossary/direct-current-electrode-positive-dcep/
Stainless Steel MIG Wire Selection
When choosing your stainless steel solid MIG wire, go for the wire that matches the base alloy of the stainless steel type you are welding. For example, if you are welding a 308 stainless steel, you should use an ER308 or ER308L stainless steel MIG wire.
But, if an exact match filler material is unavailable, it's standard to use a higher stainless alloy MIG wire. For example, you can use an ER308 MIG wire to weld 301, 302, 304, and 305 grades of stainless steel. We have a low-carbon (max .03%) ER308L stainless steel MIG wire you can apply for most of your projects. You can use the YesWelder stainless steel filler wires to weld hobby projects or join metal in a professional environment.

Amperage Output
Setting the correct amperage output for welding stainless steel takes a bit of a trial and error. Generally, to weld most steels, you need about 1 amp of power for every .001" of steel thickness. Stainless steel may require a bit less amperage because it retains heat better than mild steel. However, this depends on your shielding gas selection, desired penetration, and travel speed. Sometimes it's desirable to actually use a slightly higher wire feeding speed (amperage) than for welding mild steel. But it's best to start on a scrap piece with a somewhat lower wire feeding speed and work your way up until you find a setting that works with your travel speed.
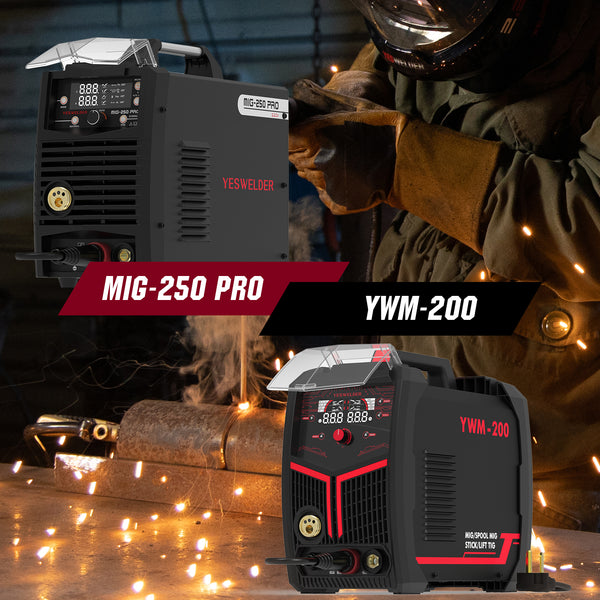
Apart from wire feeding speed, you should set your MIG inductance to improve weld puddle fluidity and wetting. The surface tension of the stainless steel weld puddle doesn't allow the molten metal to flow to the edges of the weld. But, if you increase the MIG inductance value, you'll achieve better puddle fluidity. Welders like the YesWelder MIG-250 PRO and the YesWelder YWM-200 allow you to manually modify the inductance value to match your style.
How To Pre-Clean The Stainless Steel
It's paramount to clean the stainless steel before welding from ALL contaminants. Remove contaminants like paints, oil, grease, waxes, primers, cutting compounds, pencil markings, soap, anti-spatter residues, and other hydrocarbons. If these elements are not appropriately cleaned, their carbon content can contaminate the weld and negatively impact its quality and corrosion resistance.
You need to use a dedicated stainless steel brush or a grinding wheel for stainless steel only. Don't use any previously used tools on mild steel because you can cross-contaminate these two materials and introduce carbon from mild steel to stainless steel.
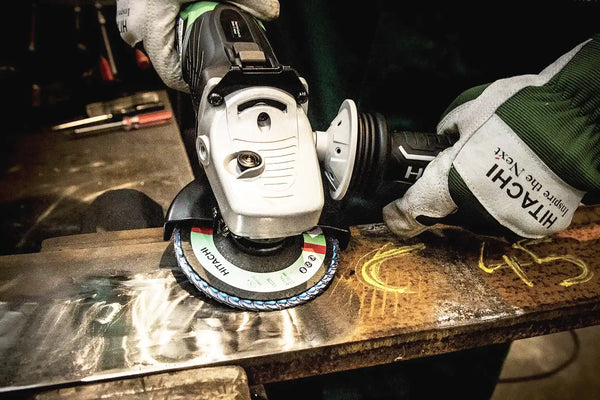
An angle grinder with a flap disc cleaning the metal.
Source: https://weldingpros.net/welding-preparation/
Additionally, avoid welding in an environment with mild steel dust in the air. For example, if you are welding a stainless steel part and someone else is grinding or cutting a mild steel element nearby. Finally, for maximum carbon contamination prevention, use a dedicated MIG gun liner for stainless steel because the liner can pick up carbon from solid mild steel MIG wires.
Techniques For MIG Welding Stainless Steel
Now that you've got your gear ready and your stainless steel parts (or scrap metal for practice) are clean let's discuss how to achieve the best MIG welding results.
Heat And Distortion Management
Since stainless steel retains heat and has a high expansion, you can easily warp and distort the welded part, especially if welding the thin sheet metal. So, besides avoiding sensitization (high heat that leads to chromium carbide formation), you must manage heat to prevent excessive distortion.
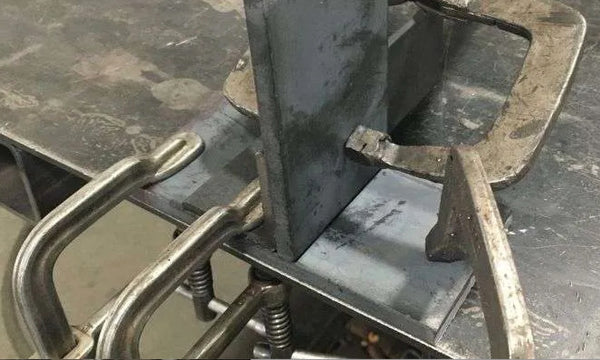
You should limit the weld metal size to the smallest possible size that provides the necessary weld strength. Using a lower volume of weld metal reduces the resulting shrinkage stresses and warpage. Additionally, ensure a proper and equal joint fit-up. Use fixtures to hold welded parts in place to prevent joint movement while welding. Spacing out tack welds equally over a large joint line may help control distortion when welding thin stainless steel sheets.
Source: https://welderslab.com/how-to-stop-metal-from-warping-while-welding
You can also use copper backing bars to remove excess heat from the welded joint. However, copper chills should be nickel plated to avoid copper inclusion in the weld; copper contamination can cause stainless steel to crack.
Purging
To achieve the highest quality weld on stainless steel, you need to purge the weld. This means that the other side of the welded joint must also be protected from the atmosphere, not just the face of the joint that is protected from the shielding gas from the MIG torch.
Stainless steel picks up oxygen aggressively when heated, so you must ensure an oxygen-free, shielded environment on both sides of the weld. Otherwise, the weld quality will suffer.
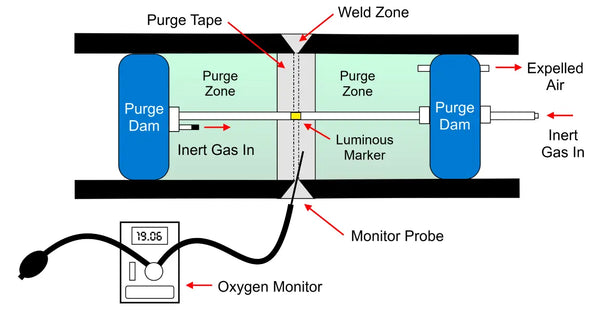
Pipe purging diagram. Source: alphaweld.com.au
Purging is almost always performed when welding stainless steel pipes because the inner part of the pipe may corrode, resulting in costly failures.
To purge a pipe, you need to tape-shut both pipe ends, poke a hole in one of the tapes, and stick a hose with argon gas in the cavity. You don't need to use a Tri-mix shielding gas for back-side purging because the role of the purging gas is simply to remove the oxygen from the atmosphere. Of course, you can also employ professional pipe purging devices, but this DIY method works well most of the time.
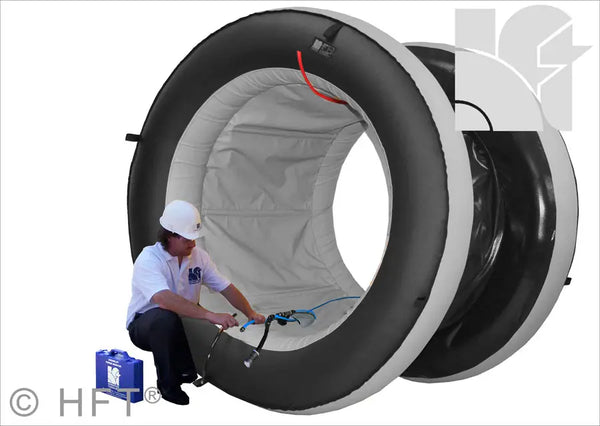
Inflatable pipe purging systems from HFT. Source: huntingdonfusion.com
If you weld stainless steel plates and don't need a maximum weld quality, it's good enough to use backing bars. They will prevent excessive heating on the underside of the joint and minimize oxidation. You won't achieve a perfect weld on the backside, but with some practice, you'll make welds of decent quality.
Travel Speed And MIG Gun Angle
You must weld relatively fast to prevent high heat concentration in one spot and avoid carbide precipitation. Finding the sweet spot may take trial and error because if you move the MIG gun too quickly, you may not achieve proper penetration. But going slow will likely result in black, overly fried welds.
Use a push technique because you'll get a better weld appearance and puddle wetting. MIG welding stainless steel works better with a stringer bead than the weave motion. The stringer bead reduces the chances of carbide precipitation in stainless steel, especially when welding pipe.

Source: https://www.materialwelding.com/what-is-welding-bead-and-their-different-types-with-uses/
Use Post-Flow Shielding Gas Coverage
Using post-welding shielding gas flow protects the heated metal from oxidizing. Under no circumstances should you remove the MIG gun torch from the end of the welding bead immediately after extinguishing the arc. Instead, keep the MIG gun nozzle with post-flow enabled over the end of the weld for about 3 seconds (or more if you use high amperage to weld thick steel). This will prevent weld contamination as it solidifies and cools down.
Source: https://www.perfectwelders.com/everything-you-need-to-know-about-mig-welding-nozzles/
Conclusion
MIG welding stainless steel is easier than TIG welding stainless steel. The automated wire feeding from the MIG welding process makes welding far easier. Plus, the MIG torch motion is relatively simple. So, properly MIG welding the stainless steel comes down to adequate pre-cleaning, equipment preparation, correct travel speed, and shielding the weld from the front and back.
While stainless steel is challenging to weld, you shouldn't give up if the first few welds don't turn out well. Practice on scrap metal first with your MIG welder until you gain enough confidence to weld more complex projects. This material has excellent properties and can significantly improve the performance and utility of many assemblies. So, it's no wonder stainless steel is used almost everywhere. Therefore, if you learn how to weld it efficiently, you can elevate your welding career or enjoy doing DIY projects that look and perform much better than mild steel.
Source: https://www.weldingboss.com/what-is-mig-welding-5-things-to-know/
2 comments


¡Es bueno saber que estás aprendiendo! Intente consultar más información sobre nuestros soldadores aquí: <https://yeswelder.com/collections/welder-cutter>
Soy totalmente neofito en el tema Pero el deseo de aprender es mayor que el primer paso
Leave a comment